Shooting Note
Drawing with Light:
The Memory of Two Eyes
A lighting note on sculpting depth, preserving shadow, and translating binocular memory into a single photograph.
Who This Note Is For
- Phone shooters: With window light, a sheet of white paper as a reflector, and a black T-shirt as negative fill, you can carve real, sculptural depth today.
- Enthusiasts: Using only EV and distance, such as ×1.11 or ×1.28, you can repeat lighting ratios without a handheld meter.
- Experienced shooters: Swap short and broad lighting, pair soft key with hard side light, and control spill or rim light to fine-tune the subject’s voice.
- Educators and retouchers: This note connects classical painting logic to modern fixtures and explains the “slightly bright → pull down” workflow.
What You’ll Take Away
- Depth comes less from total power and more from relationships between lights.
- Three subtractive moves for portrait volume: side −0.3 to −0.7 EV, a narrow rim, and negative fill.
- How to do fast A/B tests and refine ratios by distance, using inverse-square behavior rather than power changes.
How to Use This Note — Quick Start
- Place lights in this order: Key → Side → Rim → Fill → Background.
- Keep the side light from crossing the nose bridge; set it to −0.3 to −0.7 EV via distance, roughly ×1.11 to ×1.28, and feather it shallowly.
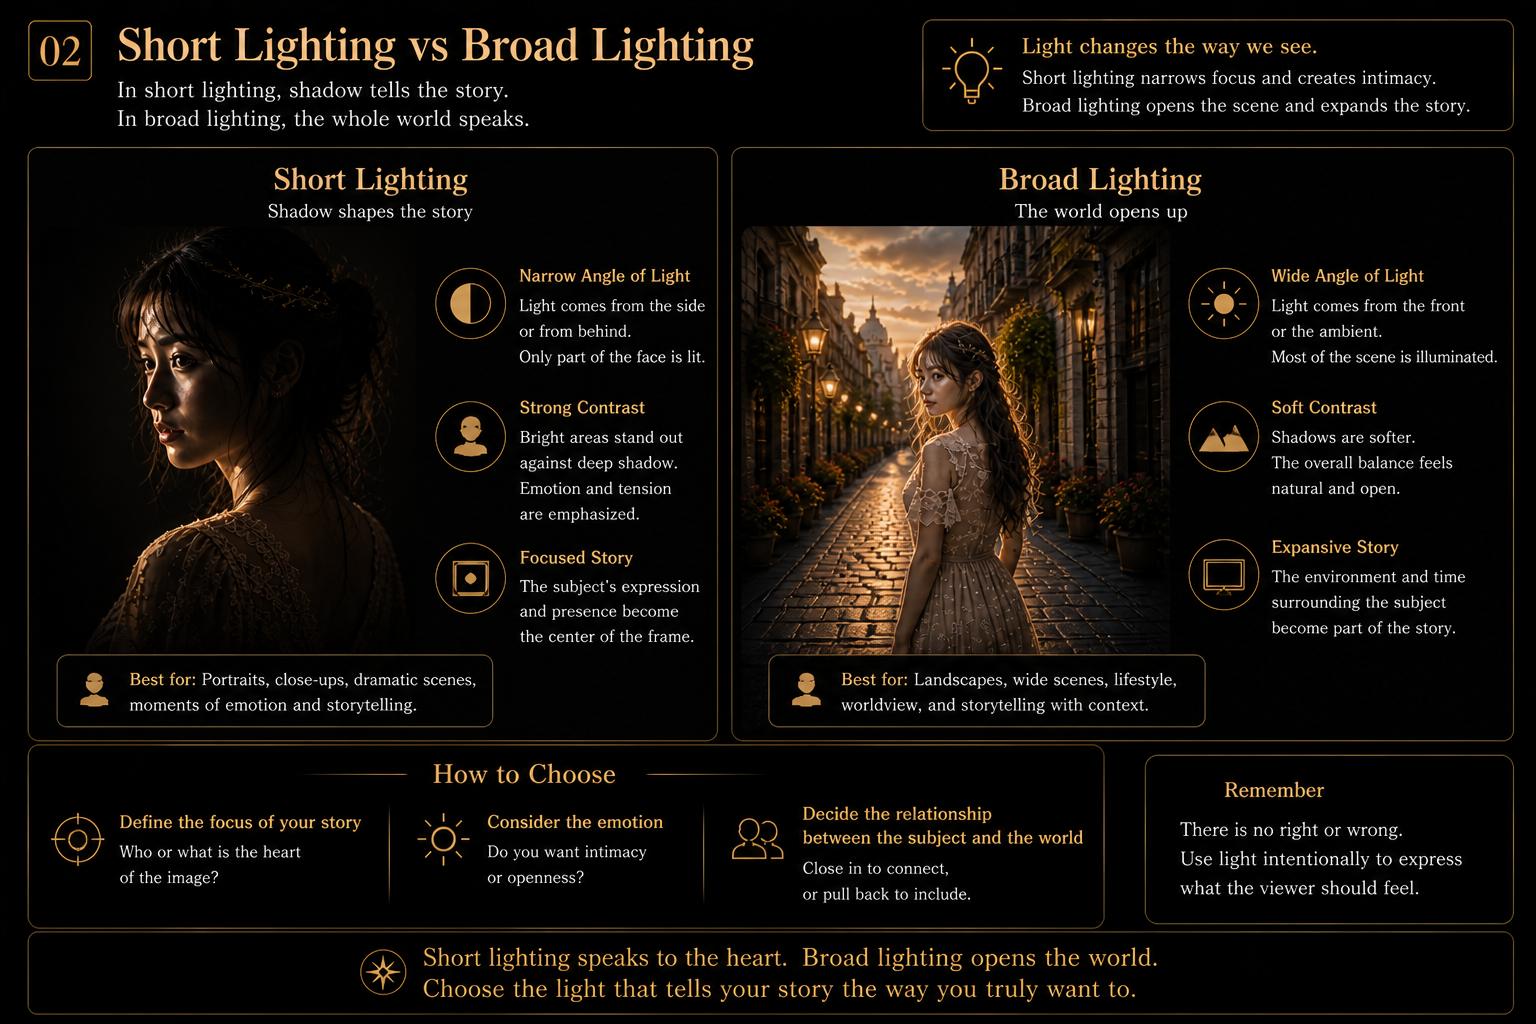
- Flip short and broad lighting, compare at 100%, and keep the better “voice.”
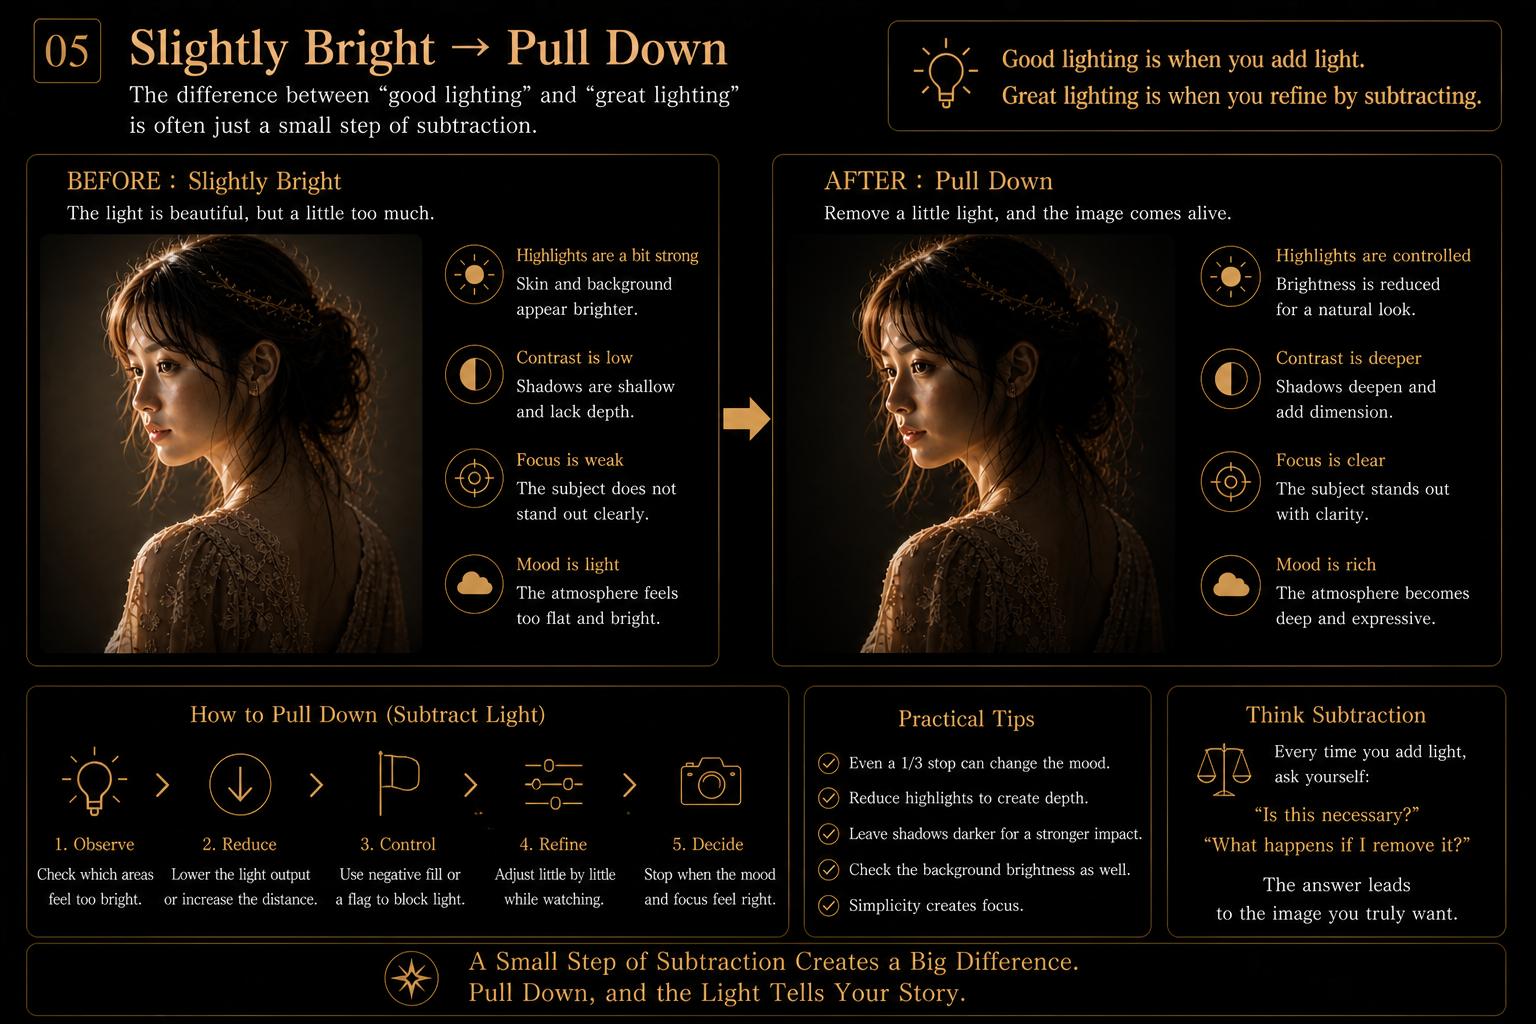
- Shoot a touch bright, then pull −0.3 to −0.7 EV in post for smooth highlight roll-off.
If you want the simplest entry: window light + white paper + black T-shirt. That alone can change your portraits.
Introduction
This article is Haru’s note on the filming of The Pencil Girl’s Diary — Dreaming of Becoming Human.
Painting has spent centuries refining ways to translate the depth our two eyes perceive onto a flat surface. To apply that wisdom to photography, I rebuilt my lighting using the cues of Rembrandt and Caravaggio.
I swap the key light left and right to follow the subject’s facing, and from a slightly raised 45° angle, I aim to suggest a small Rembrandt triangle—the tiny light triangle on the cheek. On the opposite side, a small reflector, or a distant strip box, lays a thin highlight like an oil painter’s glaze.
The side light is set about −0.3 to −0.7 EV relative to the key, roughly a 1.25:1 to 1.62:1 light ratio. This is achieved by increasing distance about 1.12 to 1.26 times and feathering from a shallow angle, so the Rembrandt triangle is not crushed.
Shadows are preserved with negative fill, and a narrow back rim separates hair and shoulders from the background, borrowing a touch of Caravaggist tenebrism.
Using modern fixtures, flags, and grids as translation tools, I intentionally flipped key sides—short and broad— and examined how cheekbone prominence, nose shadow length, and orbital shade subtly change expression and story.
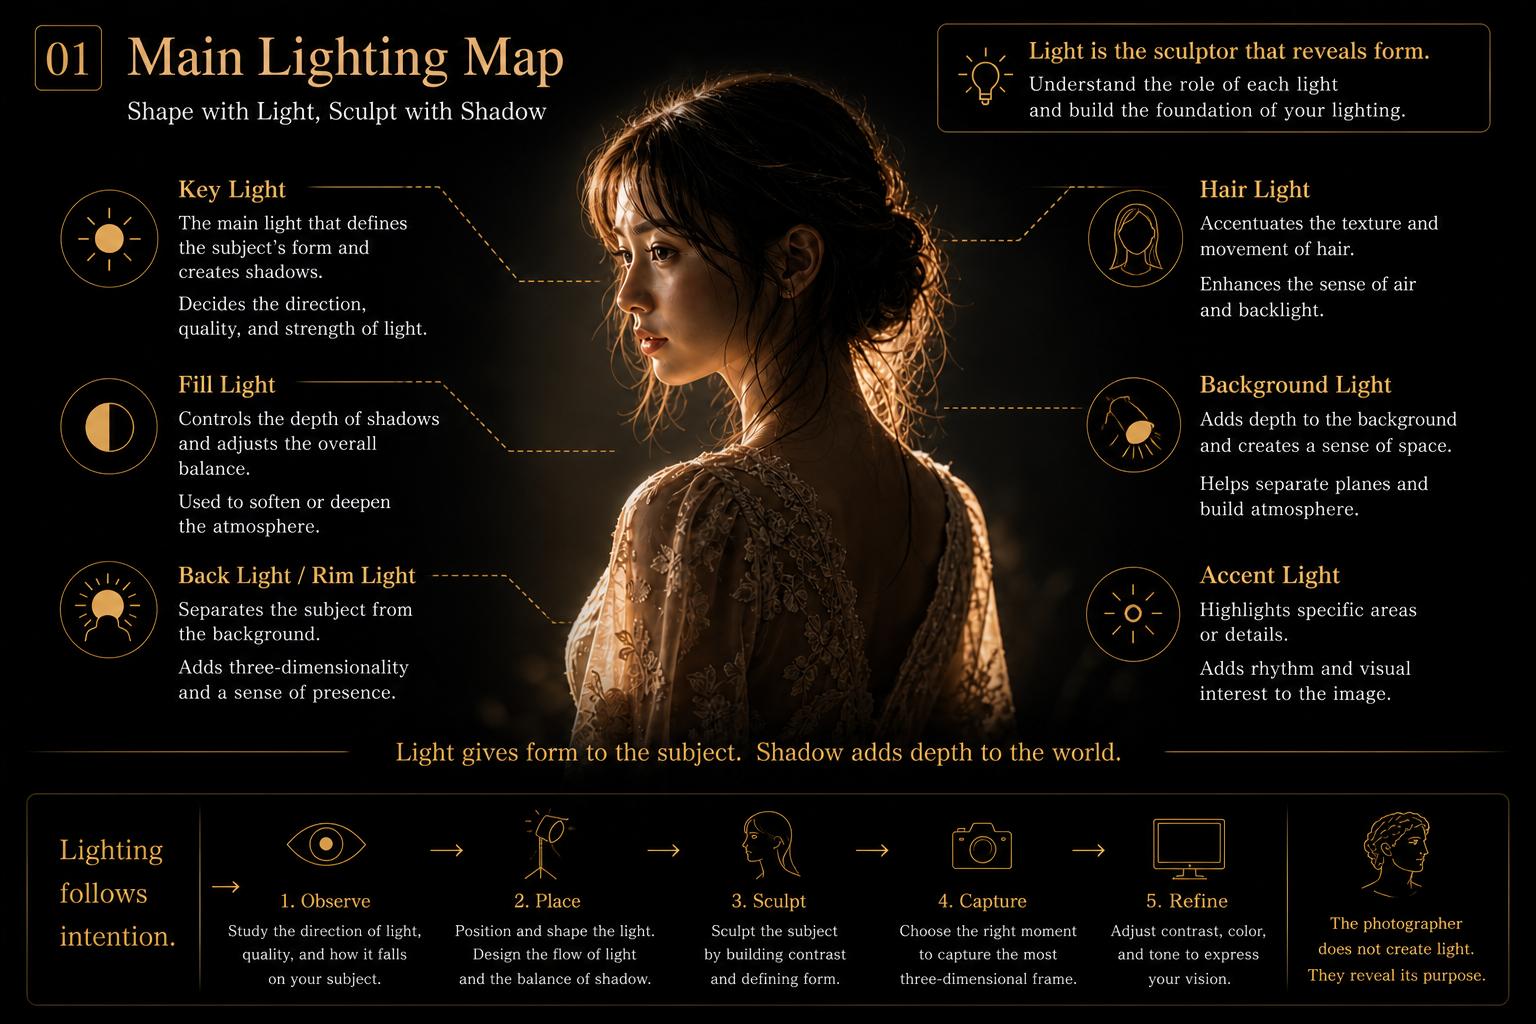
Building Depth with Layers of Light
This setup treats the face as a small journey of light across form. Light traces shape; shadow tells it. The order in which they appear creates depth.
Key Light — Midtones Anchor
Place the key where the subject looks most naturally beautiful, and watch the shape of the shadow.
- Short lighting: Key on the camera-side shadow cheek. It tends to make the face feel slimmer and gives stronger depth.
- Broad lighting: Key on the camera-side lit cheek. It tends to feel calmer, more stable, and fuller in the planes of the face.
This time, I used a soft key.
- Enlarge the apparent size with a big softbox or umbrella.
- Bring the light closer.
- Bounce off foamcore, walls, or ceiling.
- Add a white diffusion layer to further broaden the source.
- Aim for blurred shadow edges and gentle skin micro-texture.
The Rembrandt triangle is used as a guideline for shaping. In capture and grading, I keep it intentionally soft—felt as a trace defined by the cheek’s mass and the nose shadow, rather than a crisp geometric shape.
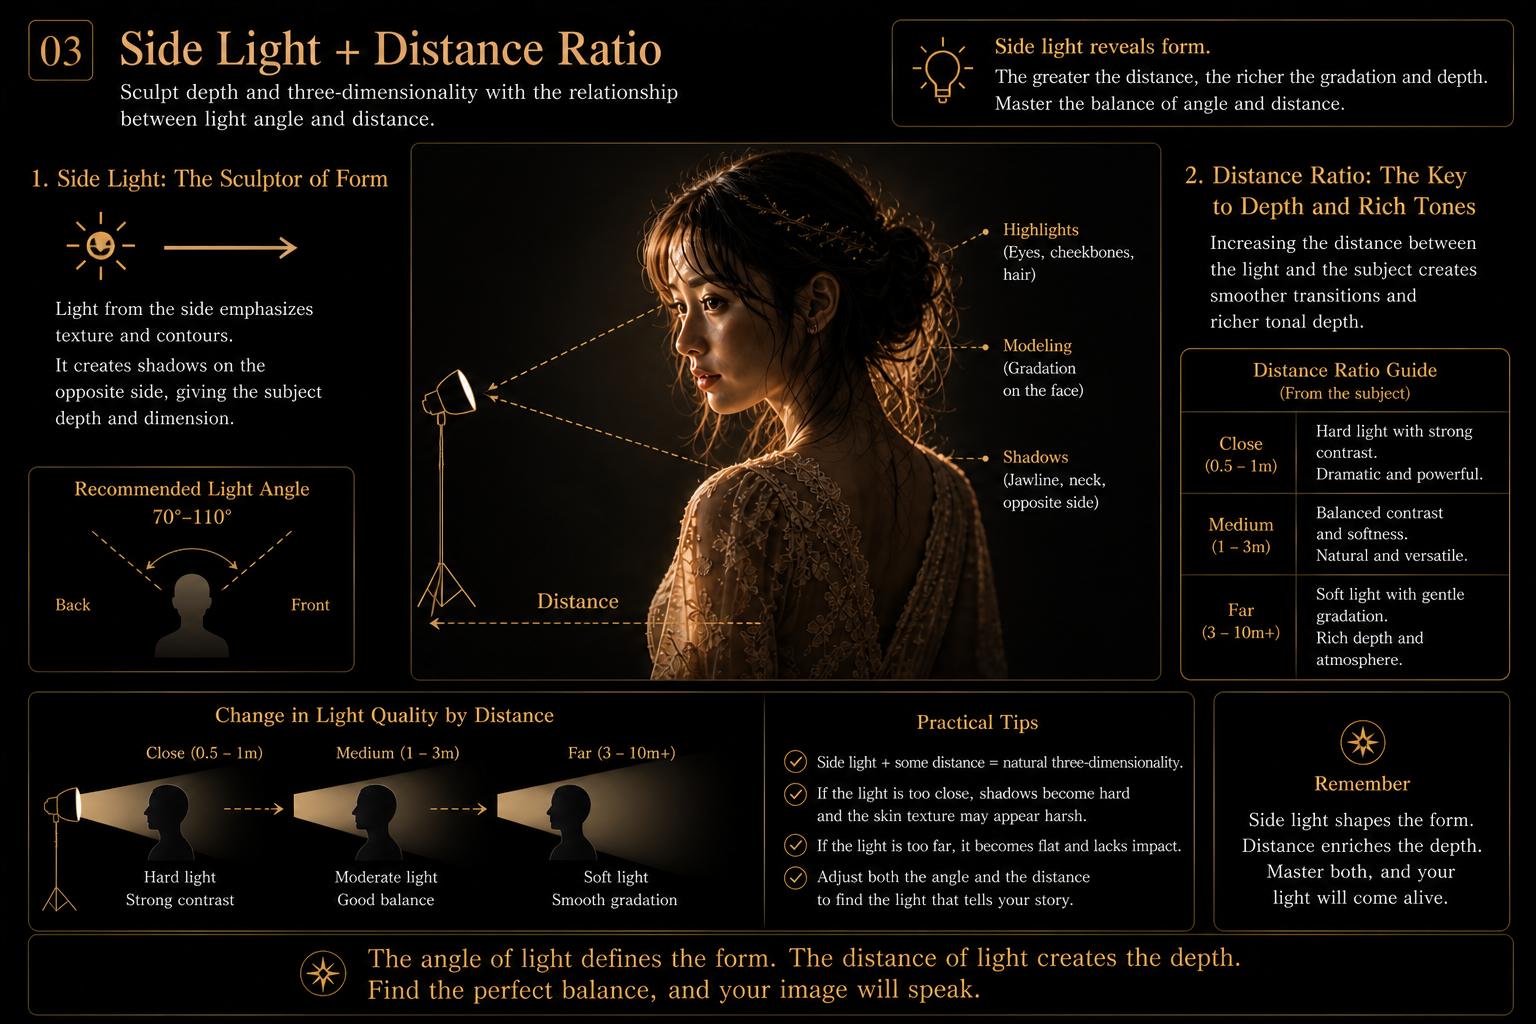
Side Light — Designing the Highlight
Apply a thin highlight only where you want it, leaving a slender shadow lane between side light and key.
This time, the side light is hard.
- Use a small or point-like source, such as a small reflector or bare-ish light quality.
- Increase distance so the apparent size shrinks and the edge tightens.
- Start around −0.3 to −0.7 EV compared with the key, roughly 1.25:1 to 1.62:1.
- Nudge by distance, around ×1.12 to ×1.26, and use shallow feathering so the triangle survives.
- The goal is a thin specular tension line—energy without flattening.
Back Rim — A Chisel for the Contour
A narrow rim on hair and shoulders lifts the subject off the background.
- Use a small reflector with a grid or barn doors for directionality.
- Aim from behind and slightly above, grazing the edge.
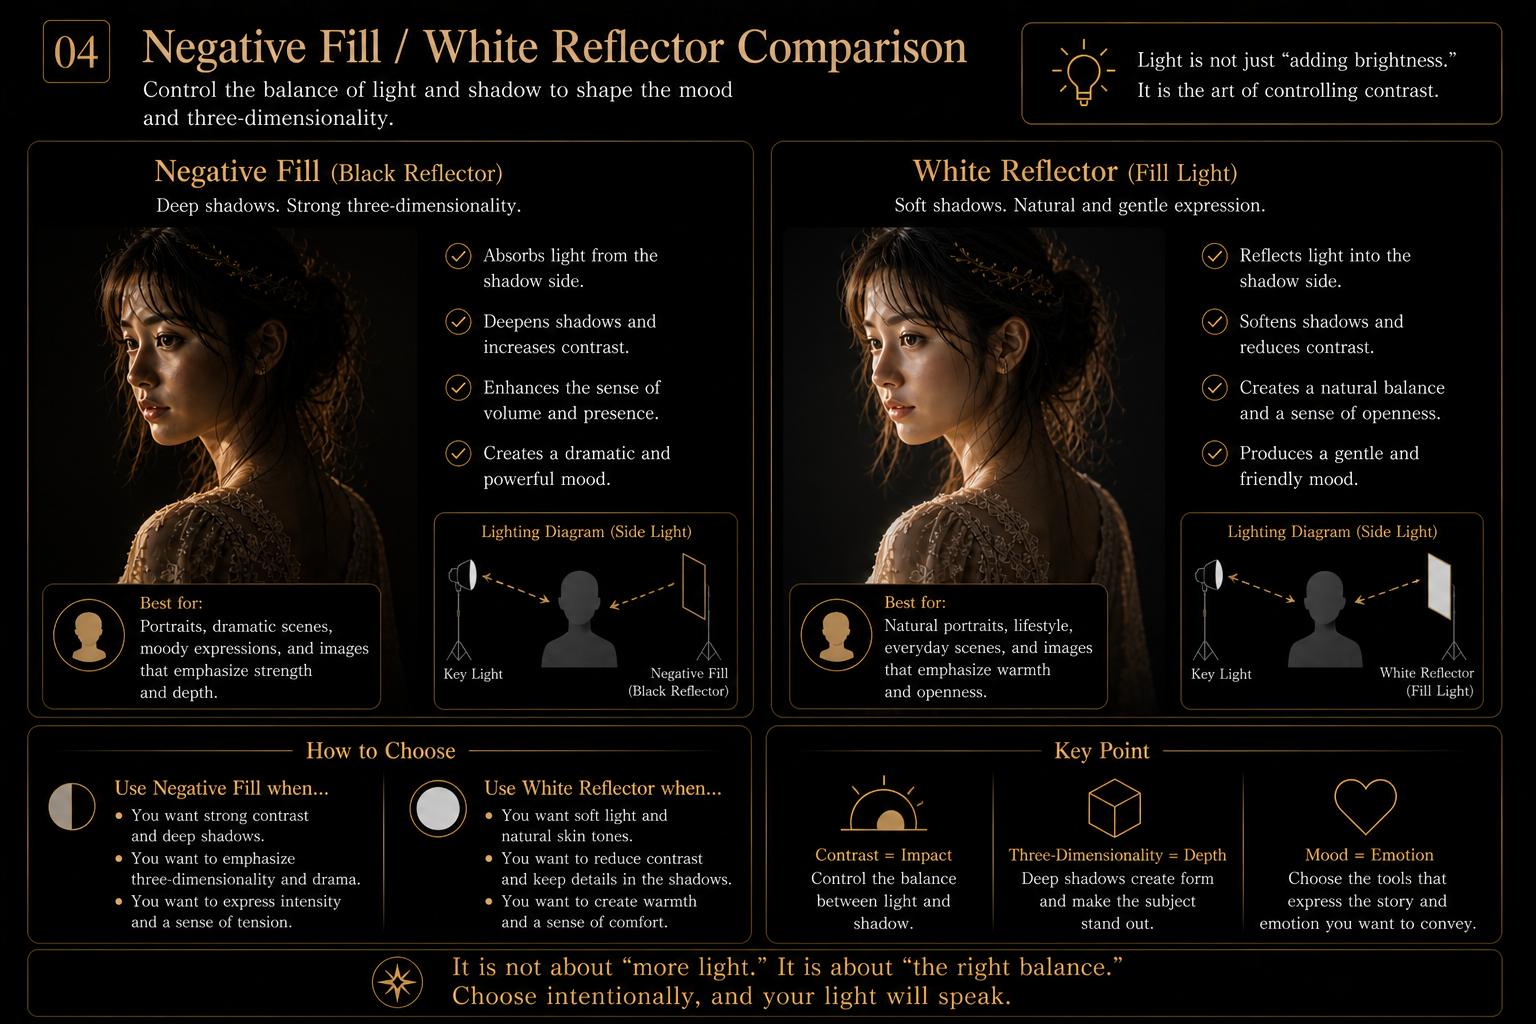
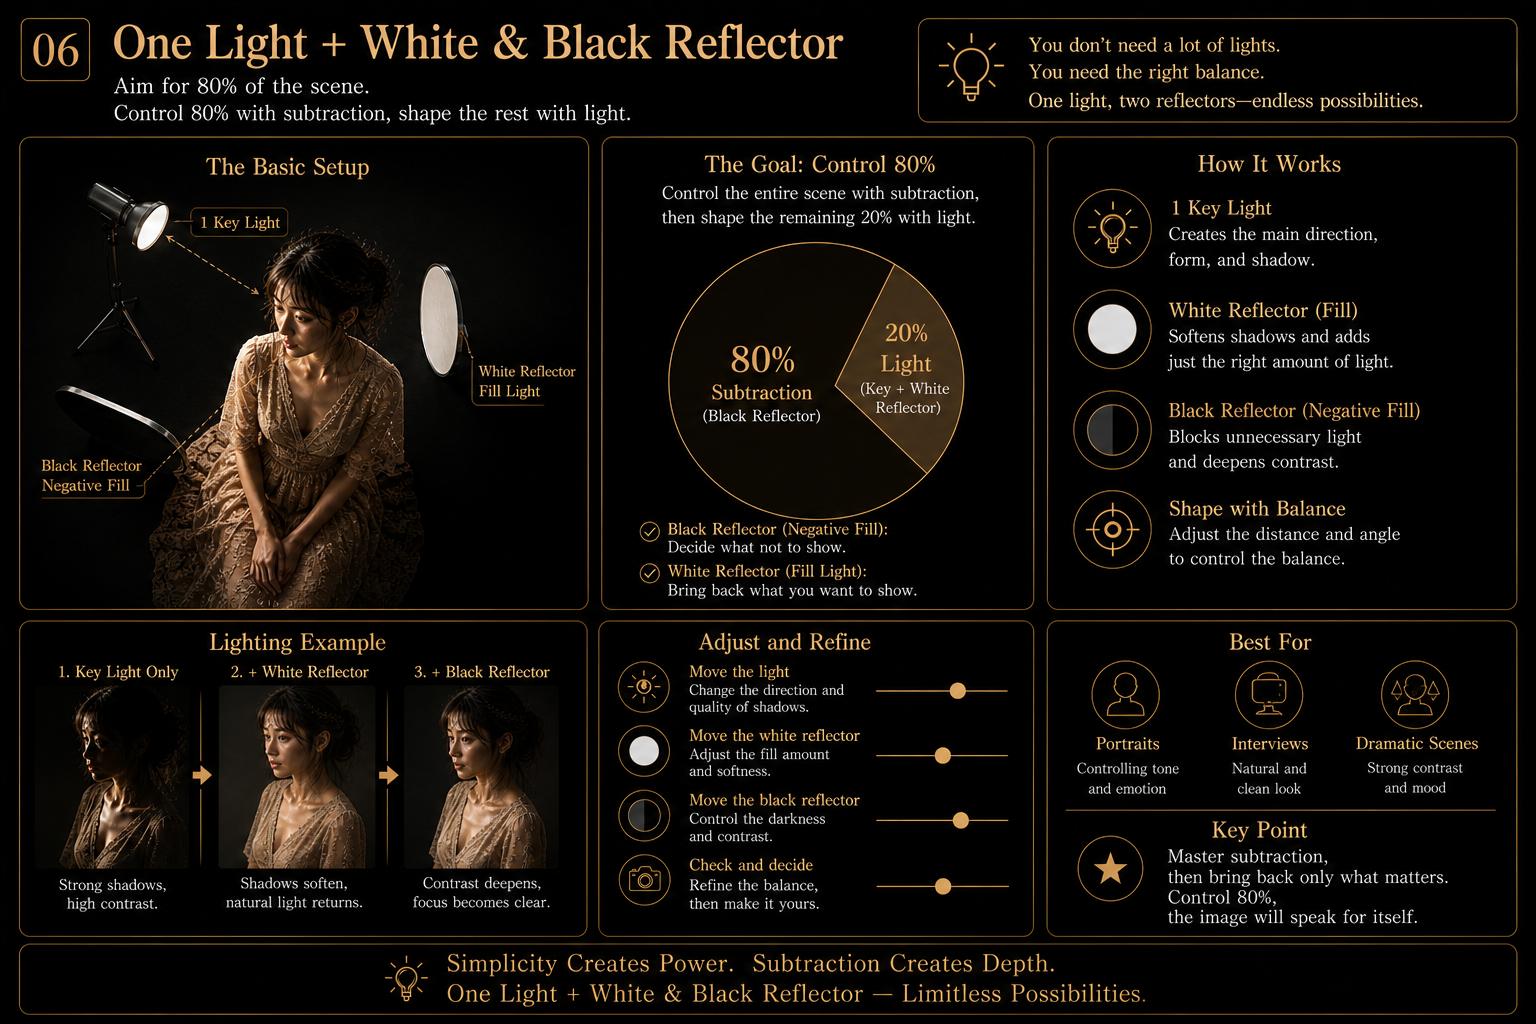
Fill Light + White / Black Reflector — Sculpting the Shadow
Don’t paint shadows bright. Shave the darkness while keeping texture.
Use black fill, or negative fill, when you want to protect depth.
Background Light — The Stage Curtain
Keep the background light independent from the other lights so the background breathes on its own.
- Use barn doors, flags, or grids on the background light.
- Use gobos or flags to stop main lights from washing the background.
- Increase subject–background distance to reduce contamination.
Field Checklist
- Order: Key → Side → Back rim → Fill / Reflector → Background. Background first is also OK.
- Try short vs. broad; watch nose shadow, cheekbone, and eye-socket shade.
- Final hardness check: side harder, key softer; tune by distance and size.
- Rim levels: dark hair 0 to +0.7 EV / light hair 0 to +0.3 EV. Avoid large clipped areas.
- Control spill with flags and grids on both subject and background.
- Check catchlight shape and specular width on skin.
- Lock white balance via gray card or skin reference; consider background harmony.
- Save short and broad test frames side by side.
Constant Light × Mirrorless: 1-Minute, No-Meter Flow
- Fix white balance with a gray card or skin baseline.
- Turn on histogram and highlight warning. Video zebras or false-color can also help.
- Key only: raise until highlights are just below warning, then roll back 1/3 stop.
- Side accent: keep it from crossing the nose bridge. Stop when a thin cheek-edge reflection appears. If warning appears, increase distance ×1.12 to ×1.26 or feather shallower.
- Back rim: allow points of warning on hair, but not broad patches.
- Fill / reflector: use the minimum needed so the 3D core does not collapse. Black fill is allowed.
- A/B: flip short and broad, review at 100%, and save both.
- Final check: catchlight hierarchy, background spill, nose-side wrap.
Why I Expose a Little Bright and Pull Down
I shoot slightly bright to keep shadow gradation rich, then lower exposure a touch in post to complete the light-and-shadow sculpture.
This preserves highlight roll-off and skin density. The risk is unrecoverable clipped whites crushing depth; I guard against that with histogram, zebras or false-color, and highlight warnings, so peaks do not stick to the right wall.
In this session, the pull-down was typically −0.3 to −0.7 EV.
Experiment Notes — Short / Broad × Hard / Soft
- Short: tighter cheek outline, lighter visual “escape.”
- Broad: calmer, more settled skin planes.
- Soft key × hard side: keeps volume while adding a fine lively edge.
- Hard rim: strengthens separation and tension; keep it sub-stop to around one stop, or it starts to feel cut-out.
- Hard light: loves pores and texture; manage it with angle, specular geometry, and amount.
- Variation: in one frame, I pushed the side slightly behind as a kicker to sharpen contour. The triangle is kept as a trace: angle 100–130°, skin key −0.3 to 0 EV, hair 0 to +0.7 EV for dark hair, or 0 to +0.3 EV for light hair.
Variations Summary
[A] Short + Soft Key × Hard Side
- Key: 45° high / softbox as baseline.
- Side: about −0.3 EV, roughly 1.25:1, with strip or small reflector. Do not cross the nose bridge.
- Rim: hard. Hair: dark 0 to +0.7 EV / light 0 to +0.3 EV.
- Effect: strong depth, airy gaze.
- Watch: pores. Keep the side thin through angle and distance.
[B] Broad + Rear-Pushed Kicker
- Key: bright side / umbrella bounce.
- Side: 100–130° behind-leaning, around −0.7 EV, roughly 1.62:1, as a kicker.
- Rim: hard but conservative.
- Effect: reassurance plus a taut outline.
- Watch: clipping and shadow depth.
[C] Short + Hard Key × Soft Side — Trial
- Key: 45° / small hard reflector.
- Side: −0.3 EV with soft diffusion.
- Rim: soft, around 0 EV.
- Effect: dramatic contrast.
- Watch: skin texture emphasis.
Use these as A/B templates. Shoot two patterns side by side, log distance, angle, and ΔEV, then refine ratios by distance rather than power changes.
Subtractive Trials — Simplifying the Rig
- One-light: key at 45° with softbox + white / black V-flat. Control shadow depth with the reflector and recreate the Rembrandt trace. Around 30 seconds.
- Two-light: key + gridded rim. Skip the side light and let the key angle stand in for it. Around 45 seconds.
Next time, I’ll chase about 80% of the full look with one light + reflector. Simpler often boosts creativity; for repeatability, log distances.
Insights
- Depth comes less from absolute power and more from relationships between lights.
- Shadow is not a flaw; it is the margin that elevates the highlight.
- An independent background light lets the space breathe.
- The order of light here echoes binocular depth surprisingly well.
- Flipping key sides becomes an editorial cut that quietly changes the subject’s voice.
Challenges
- Multi-layer lighting takes time to balance.
- I want to keep exploring simpler rigs that preserve the effect.
- No handheld meter yet, so ratio estimates are feel-based; I’ll try a simple app next time to log numbers.
- More tests are needed on more subjects beyond dolls; skin and hair variety will change the dials.
- Under time pressure, I want setup fluency under five minutes.
Closing
For centuries, painters have sculpted depth by placing light and shadow—nothing more.
Photography can house those same timeless optics inside a single moment.
Where I set the light is how I choose to look at the subject.
This lighting was an attempt to leave, not what the eye sees,
but what the heart remembers—quietly—on the photograph.