Shooting Note
Working with
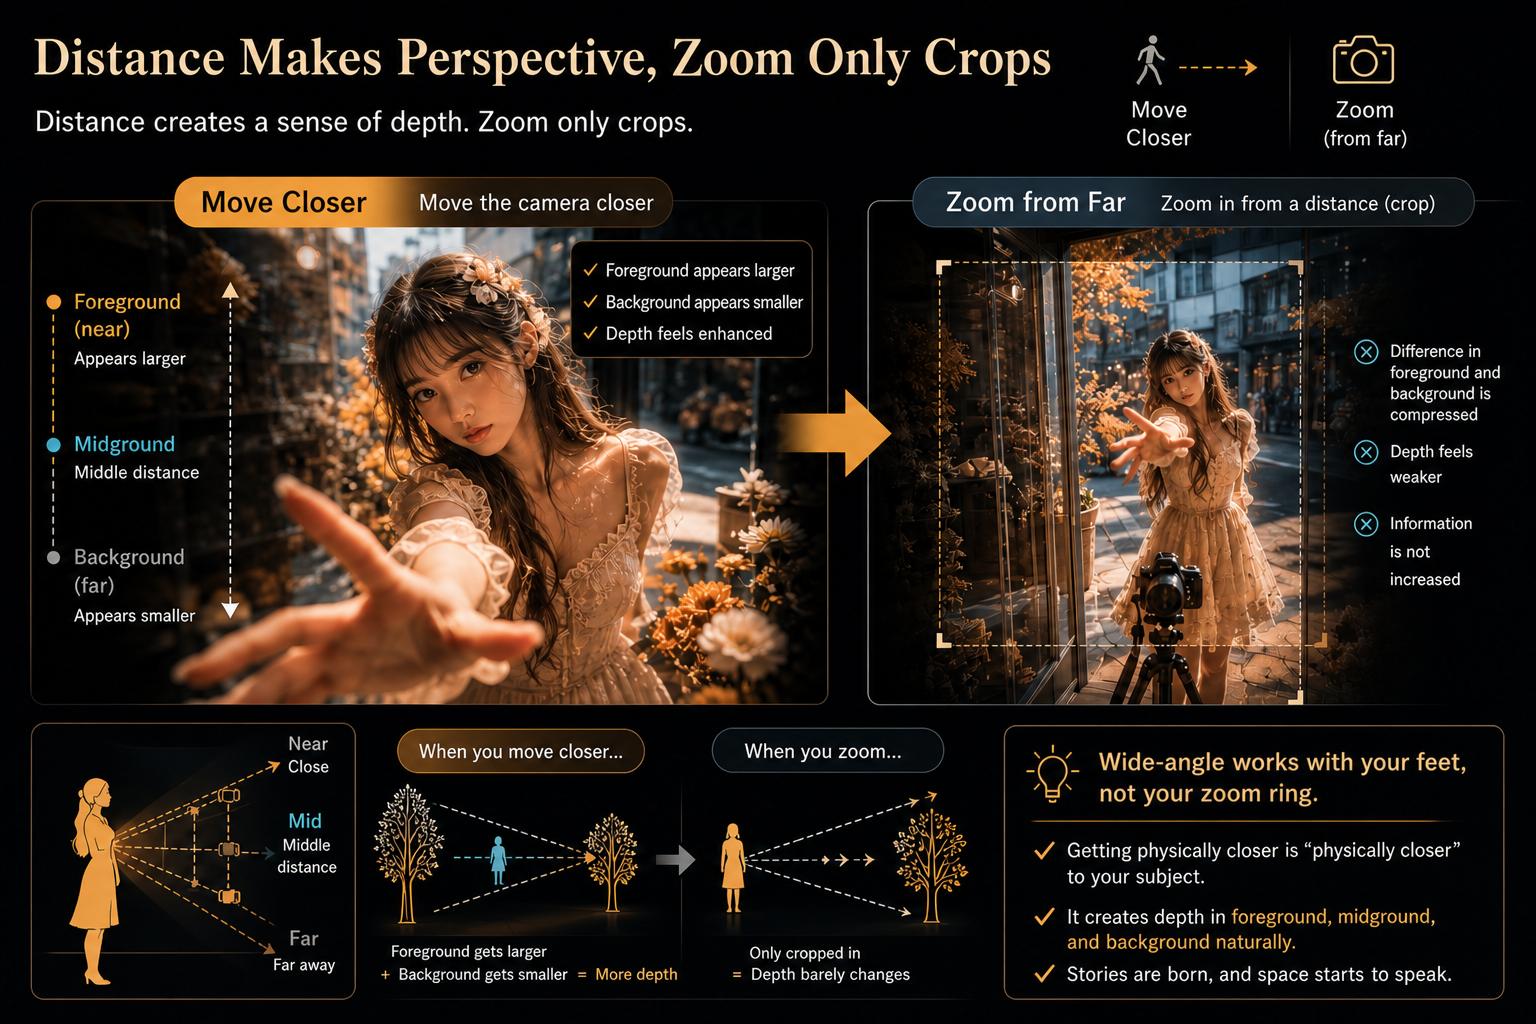
Distance Perspective
The closer you get, the more the space speaks.
Distance Perspective as a Way of Letting Space Speak
The charm of wide-angle lenses might lie in distance perspective — exaggerated depth.
Each step closer seems to make the near grow larger and the far grow smaller, quietly raising foreground, midground, and background as distinct layers in the frame.
The order matters.
It isn’t that foreground emphasis, leading lines, breadth, and scale appear first and then depth becomes stronger.
Rather, by intentionally exaggerating depth — that is, by designing distance perspective — those qualities tend to emerge as natural results.
A gentle first step could be to decide what you want to approach. The thing you move toward often becomes the subject, and the distance at which you touch that subject softly sets the strength of the image.
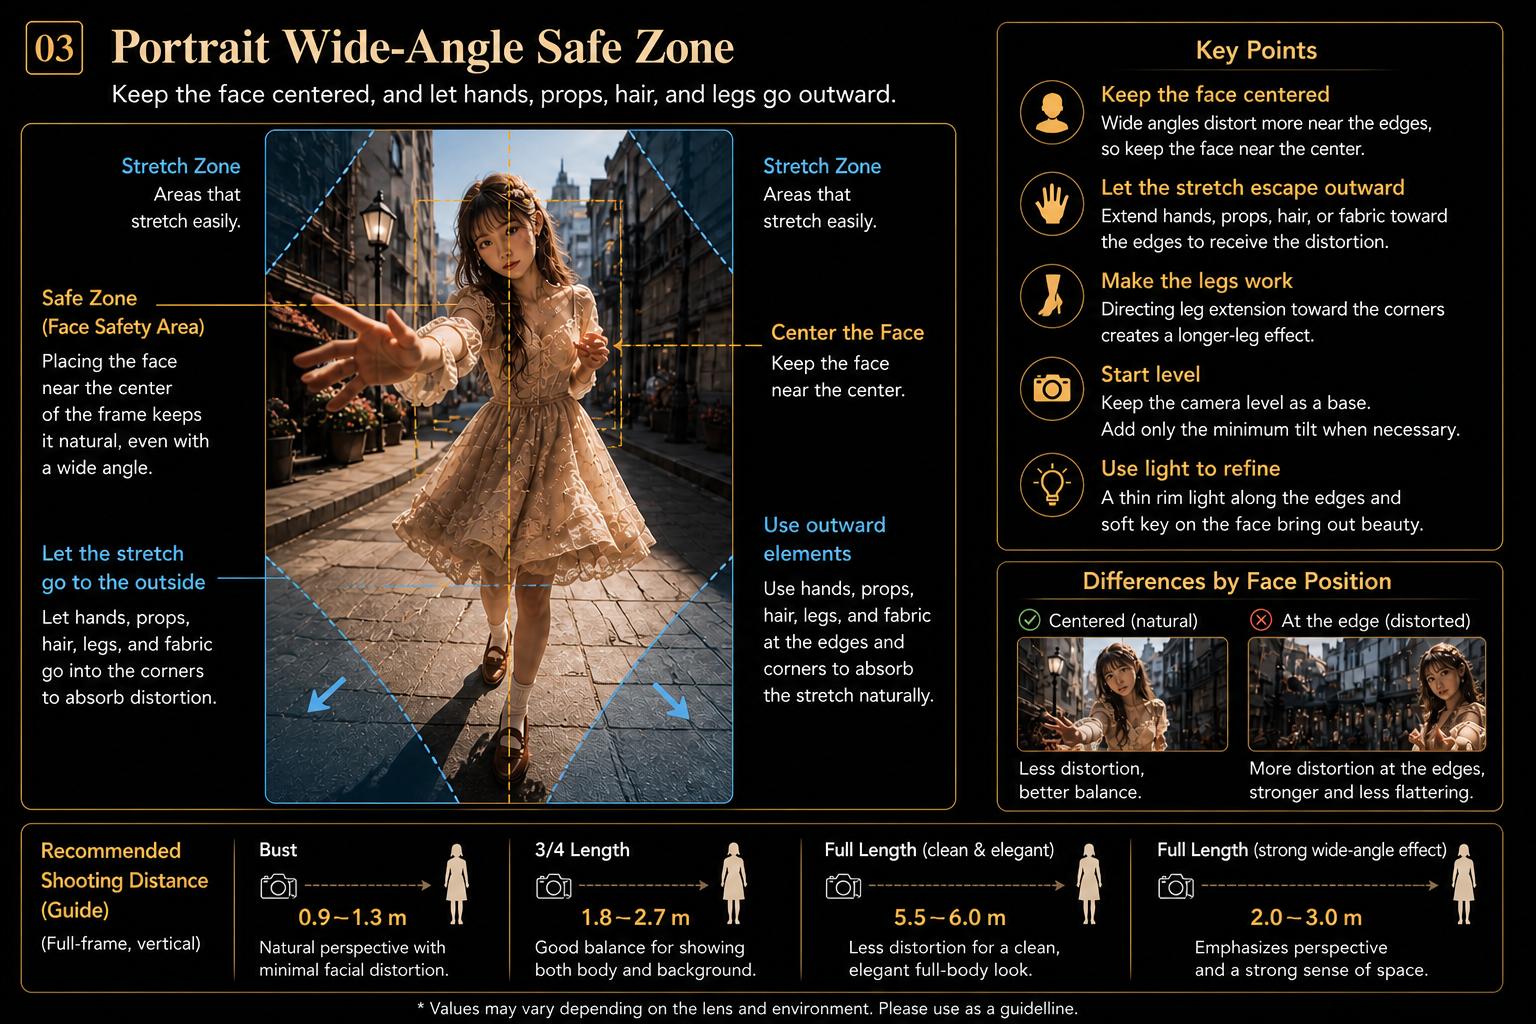
Portraits: Taming Distortion and Turning It into Intent
Keep the Face Near the Center
Corners stretch more on wide angles, so centering the face — or placing it slightly inboard — often feels more natural.
If the face drifts outward, placing a hand, prop, or hair toward the edge can “catch” the stretch and make distortion less noticeable.
Let the Stretch Go to the Legs
Steering edge stretch toward the legs can give a longer-leg impression.
Toes a touch forward, body slightly angled, face near center — this balance tends to behave nicely.
Start Level
To keep verticals calm, begin level with no tilt, then add the smallest tilt only if needed.
Decide What to Approach
Whatever you move toward becomes the grammar of the frame — face, hands, fabric texture, and so on.
That touching distance gently governs the picture’s power.
Polish with Light
A fine, narrow rim along the outer edges can tidy stretch; a soft key on the face keeps it graceful.
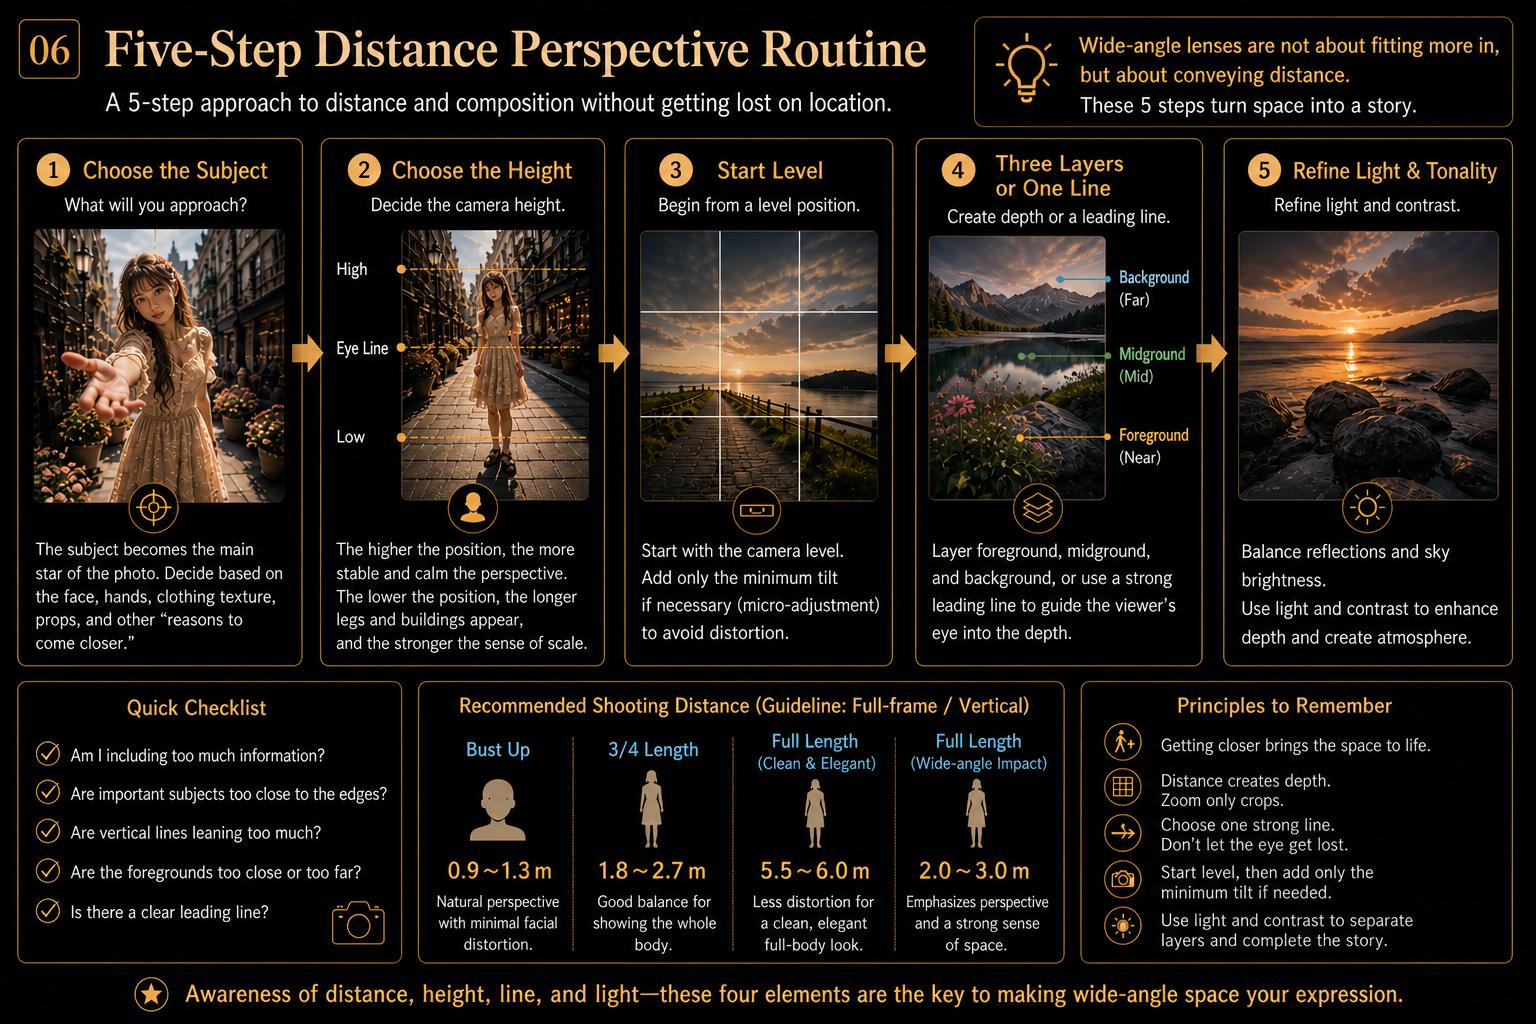
Small guide — full-frame, vertical:
Bust: 0.9–1.3 m.
3/4 length: 1.8–2.7 m.
For a clean, elegant full-length, a longer end around 5.5–6 m can help.
For wide-angle energy, 2–3 m is a comfortable range.
Landscapes: Guiding the Eye to “Show” the Depth
Low to High
With buildings or trees, a low camera height plus a slight up-tilt often carries a strong vertical convergence and sense of scale.
Dropping close to ground level can be surprisingly effective.
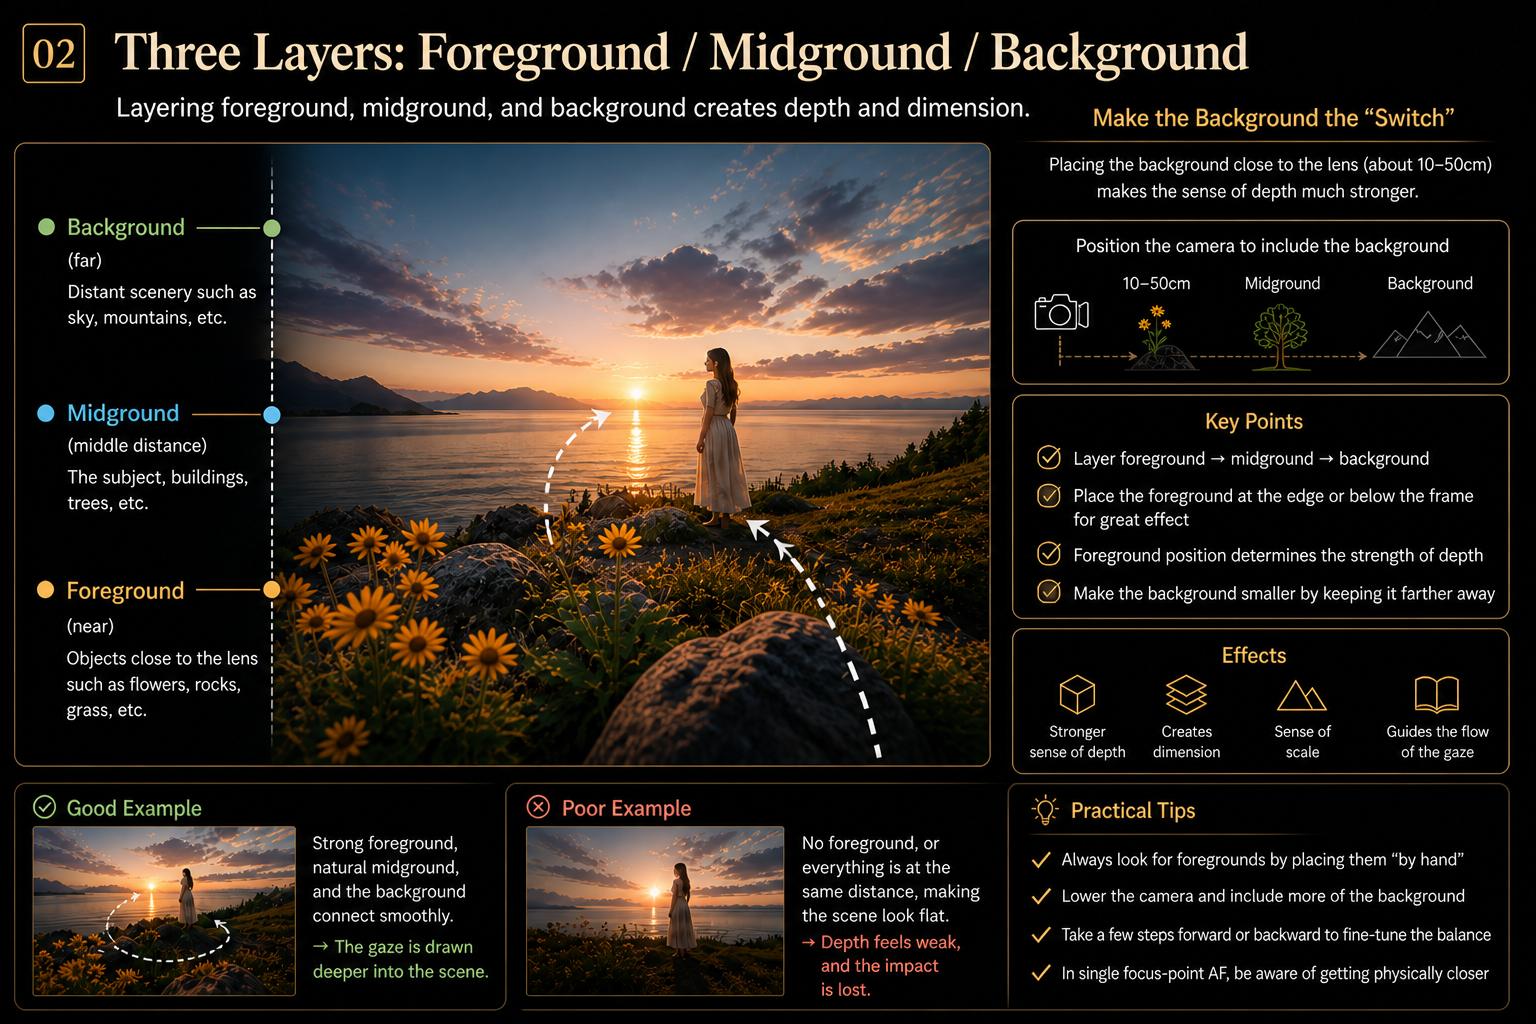
Place Foreground — by Hand
Try setting a foreground element — rock, flower, railing — 10–50 cm from the lens, then layer midground → background.
The foreground position feels like the master switch.
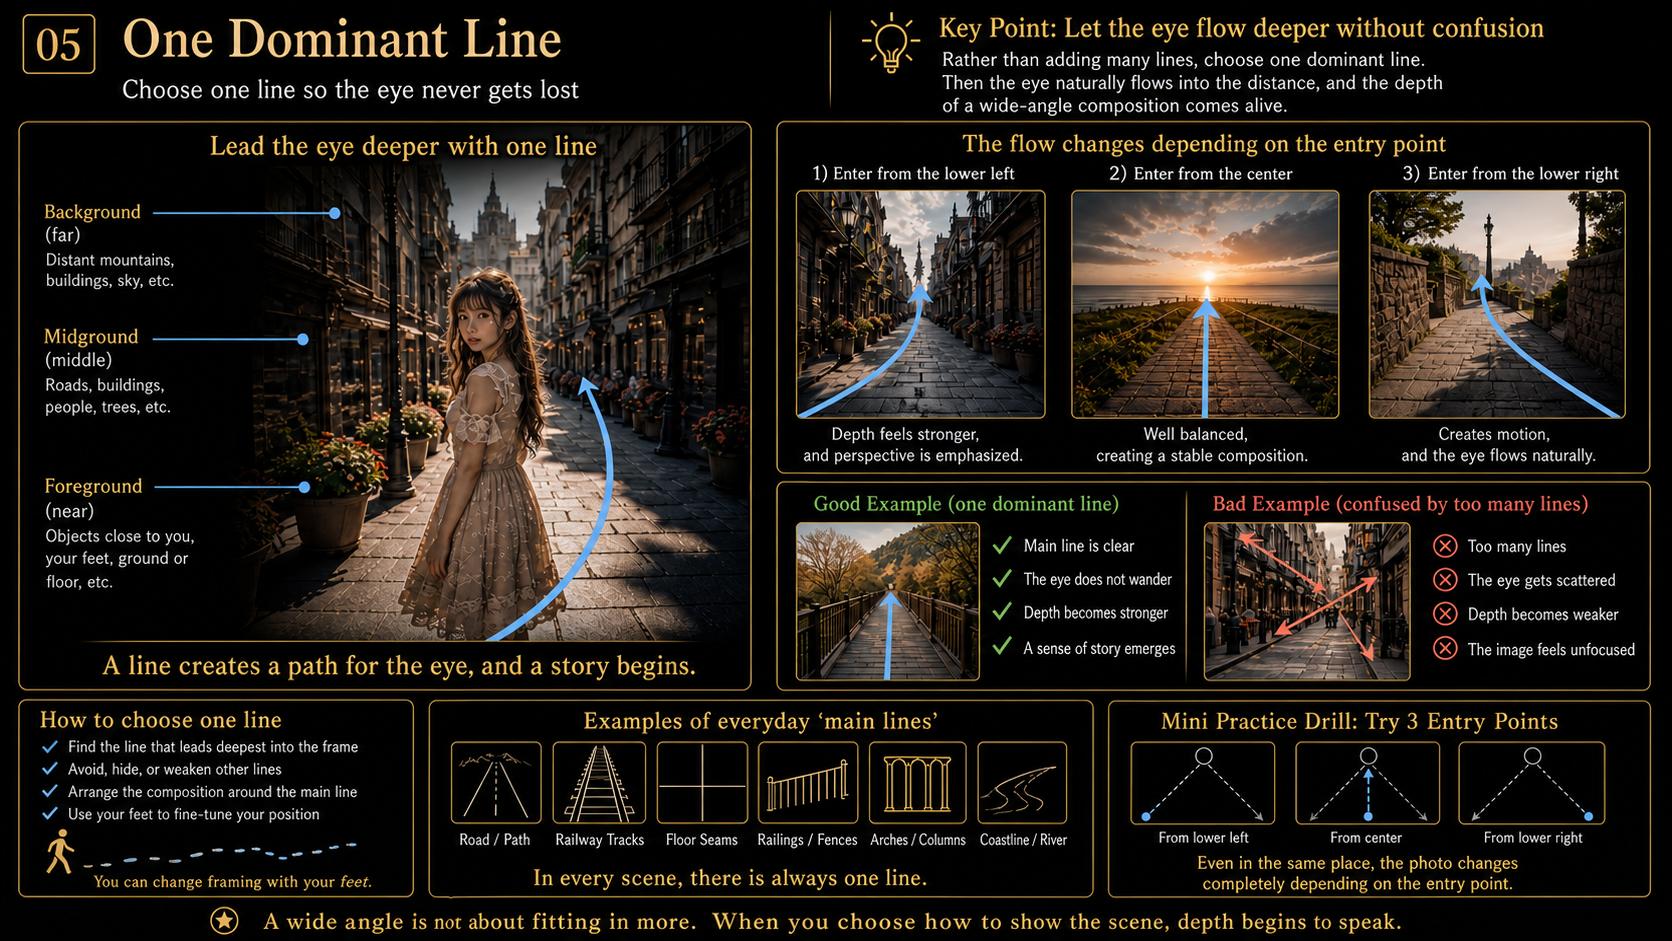
One Main Line
For leading lines, choosing one dominant system helps the eye travel without confusion.
Other lines can be avoided, hidden, or softened.
Tidy Reflections and Sky
A polarizer can manage reflection; a graduated ND filter can gently balance sky and land so the depth read stays clean.
With wide angles, polarizers can produce uneven skies. Slightly back off the strength or plan to finesse it later.
A Simple Five-Step Design Routine
This routine works for both portraits and landscapes.
- Choose the subject: What will you move toward?
- Choose the height: What do you want to look longer, larger, or more powerful?
- Start level: Add the tiniest tilt last, only if needed.
- Three layers or one line: Build with foreground placement, or guide the eye through a single leading line.
- Refine light and tonality: For portraits, use a soft center and fine rims. For landscapes, consider PL and GND carefully.
These are merely starter rails — easy to adjust on location as the scene speaks back.
Small Notes for Avoiding Common Pitfalls
- Keep faces and key details away from the four corners. Stretch shows quickly.
- Too much information? Use your feet. Wide angle is not an excuse to include everything.
- Don’t get too close. For a bust, 0.9–1.3 m tends to stay graceful.
- Mind the verticals, especially with architecture and trees. Gentle post tweaks can help.
Quick Mini-Drills
Face-Center Drill — Portraits
Keep the face within ±10% of center and use hands, hair, or props to receive the edge stretch in a few variations.
Foreground-at-30 cm Drill — Landscapes
Place a foreground at around 30 cm, then look, nudge, and re-place. Repeat until the three layers click.
Single-Line Patrol
Find a single line — road, rail, grout line — and try left-bottom, center, and right-bottom entry points to compare flow.
A Brief Note for Working Pros
- Distance makes perspective; zoom crops.
- Level first; keep any tilt to the minimum. Vertical skew within ±2–3° is easy to tidy later.
- Let the edge stretch be carried by outward elements — hand, prop, hair, or fabric.
- Wide-angle PL can overdo the sky; soften the effect a notch.
- Gentle local warps, around 10–15%, can resolve edge stretch without calling attention to themselves.
Closing
Taken this way, a wide angle becomes less about “fitting everything in” and more about letting distance write the story.
The closer you get,
the more the space speaks.